
Keeping your brick buildings looking good and standing strong is pretty important, right? Over time, the stuff holding the bricks together, called mortar, can start to break down. This is where tuck pointing comes in. It’s basically a way to fix up those worn-out mortar joints, making your walls look better and preventing bigger problems down the road. We’re going to walk through what tuck pointing is all about, why it matters, and what you need to know if you’re thinking about getting it done.
Key Takeaways
- Tuckpointing is the process of removing old, damaged mortar from brick joints and replacing it with new mortar to restore structural integrity and appearance.
- Signs that tuckpointing might be needed include crumbling mortar, water damage, loose bricks, and discoloration of the mortar.
- The tuckpointing process involves preparing the area, removing old mortar, applying new mortar, and finishing the joints for a clean look.
- Matching the mortar’s color, texture, and composition to the existing material is vital for a seamless repair.
- While DIY tuckpointing is possible for small areas, complex repairs or large projects are best handled by experienced professionals to avoid mistakes and ensure quality.
Understanding Tuckpointing: Definition and Purpose
So, what exactly is tuckpointing? At its core, it’s a masonry repair technique focused on fixing the mortar joints between bricks or stones. Think of mortar as the glue holding your brickwork together. Over time, this ‘glue’ can start to crumble, crack, or wash away, especially with exposure to weather. When that happens, your brick walls aren’t as strong as they should be, and water can start to sneak in, causing bigger problems down the line.
What is Tuckpointing?
Tuckpointing is essentially the process of removing old, damaged mortar from the joints and then packing in fresh mortar. It’s not just about filling holes; it’s about restoring the integrity and appearance of your masonry. This process is vital for maintaining the health of any brick or stone structure, from your home’s exterior walls to chimneys and fireplaces. It helps prevent further deterioration and keeps your building looking its best.
The Origins of the Term "Tuckpointing"
The name "tuckpointing" itself comes from a traditional method used by masons. They would often use two different colors of mortar. One mortar would fill the joint, and then a second, finer mortar, often matching the color of the bricks, would be applied as a thin strip along the edges. This created the illusion of very fine, neat joints, making the brickwork look sharp and precise. It was a way to make repairs look intentional and aesthetically pleasing, almost like a decorative detail.
Why Tuckpointing is Essential for Masonry
Why bother with tuckpointing? Well, it does a few really important things. First off, it stops water from getting into your walls. When mortar joints are compromised, water can seep in, freeze in the winter, and expand, causing bricks to crack or ‘spall’ (flake off). This can lead to serious structural issues over time. Secondly, it keeps the bricks firmly in place, maintaining the overall stability of the structure. A well-executed tuckpointing job can significantly extend the life of your masonry, potentially saving you from much more expensive repairs or even rebuilding down the road. It’s a proactive maintenance step that protects your investment and keeps your property looking good. If you’re noticing issues with your mortar, it’s a good idea to look into professional tuckpointing services to get it sorted before it becomes a bigger headache.
Identifying the Need for Tuckpointing
So, how do you know if your brickwork is crying out for some attention? It’s not always obvious, but there are definitely signs to look for. Ignoring them can lead to bigger, more expensive problems down the road, and nobody wants that. Think of it like a regular check-up for your house’s exterior – catching issues early saves a lot of hassle.
Signs of Deteriorating Mortar Joints
This is usually the most visible clue. The mortar is the stuff that holds your bricks together, and like anything, it wears out. You might see a few things happening:
- Cracked or Crumbling Mortar: Look closely at the lines between your bricks. If you see tiny cracks, or if bits of the mortar are flaking off and falling onto the ground, that’s a clear sign it’s past its prime. This is the most common indicator that tuckpointing is needed.
- Missing Mortar: Sometimes, it’s not just cracked; it’s gone. You might see actual gaps where the mortar used to be. This is bad news because it leaves the inside of your walls exposed.
- Mortar That Sticks Out Unevenly: If the mortar is bulging out or looks like it’s not sitting flush with the bricks anymore, it can mess with the overall look and even the stability of the wall.
The Impact of Water Damage on Mortar
Water is a brick’s worst enemy, especially when it gets into the mortar joints. It can cause all sorts of trouble.
- Water Stains and Discoloration: Dark streaks running down your brick walls or a general fading and uneven coloring can point to water seeping in through bad joints.
- Efflorescence: This shows up as a white, powdery residue on the surface of the bricks. It happens when water dissolves salts within the masonry and then evaporates, leaving the salt behind. It’s a pretty good sign that moisture is getting into your walls.
- Spalling Bricks: This is when the surface of the brick itself starts to chip, flake, or crumble away. It often happens when moisture gets trapped inside the brick and then freezes and expands, pushing the surface off. Bad mortar joints are often the entry point for this moisture.
Water damage isn’t just about looks; it can weaken the entire structure over time. It can lead to mold growth inside your home, make your heating and cooling systems work harder, and eventually cause serious structural issues if left unchecked. Addressing the source of the water, which is often compromised mortar, is key.
When Loose Bricks Signal a Need for Repair
Sometimes, the problem goes beyond just the mortar. If the bricks themselves start to get loose, it’s a pretty serious warning sign.
- Wobbly Bricks: If you can gently push a brick and it moves, or if it feels loose in its spot, the mortar holding it has likely failed. This is a safety concern.
- Visible Gaps Around Bricks: Even if the mortar isn’t completely gone, you might see small gaps forming between the bricks and the mortar. This is an invitation for water and pests.
If you notice any of these issues, it’s a good idea to get a professional to take a look. They can tell you if it’s a simple fix like tuckpointing or if there are more involved masonry restoration needs. Catching these problems early can save you a lot of headaches and money in the long run.
The Tuckpointing Process Explained
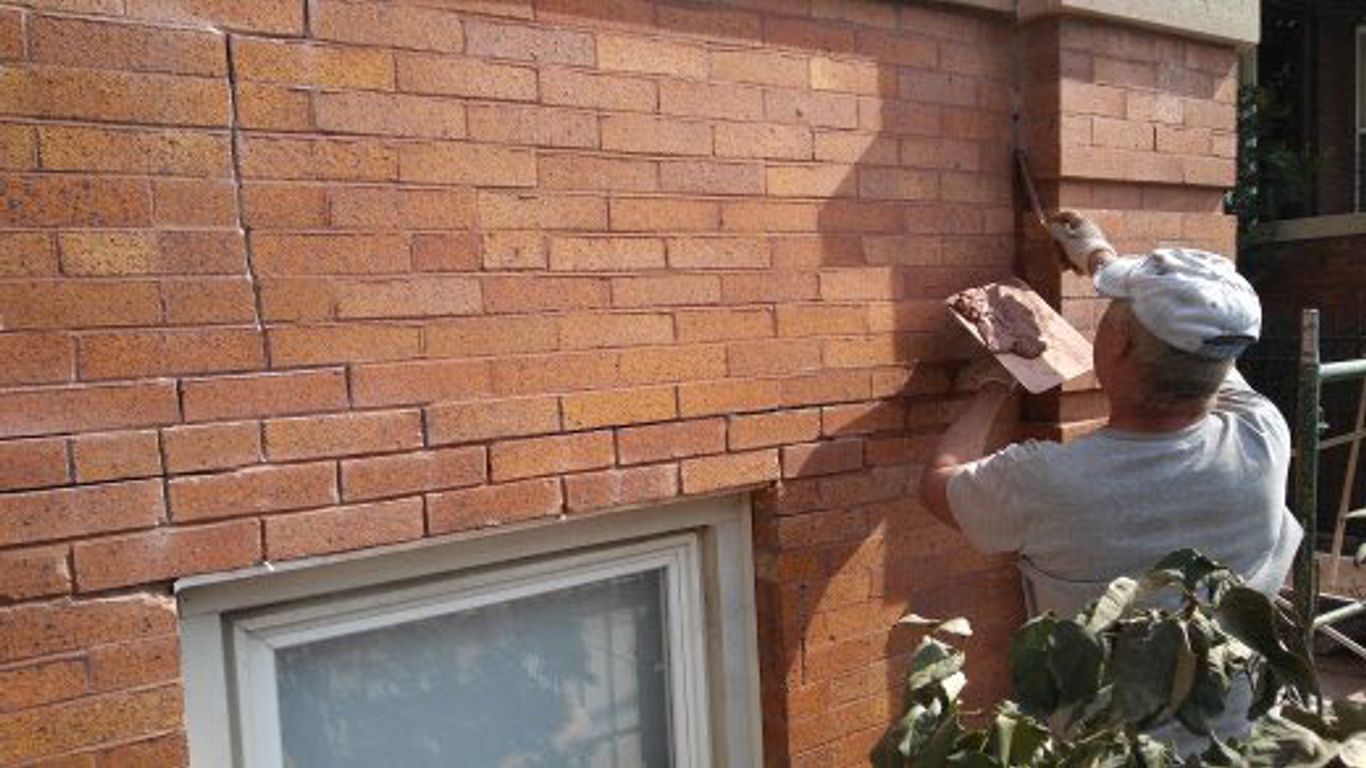
So, you’ve noticed the mortar on your brick walls is looking a bit sad. What’s next? Well, tuckpointing isn’t some magical fix; it’s a methodical process. It starts with a good look at what we’re dealing with, then gets down to the nitty-gritty of removing the old stuff, and finally, putting in the new.
Initial Assessment and Planning
Before any tools come out, someone needs to check out the brickwork. This isn’t just a quick glance. They’re looking for how bad the mortar damage is, checking if the bricks themselves are okay, and figuring out the best way to tackle the job. This planning stage is super important because it sets the stage for everything that follows. It helps decide what kind of mortar to use, how much material is needed, and roughly how long it’ll take. It’s like drawing up a blueprint before you start building.
Preparation and Mortar Removal
This is where the real work begins. First, the area needs to be prepped. This means protecting anything nearby that you don’t want to get dusty or damaged. Then comes the removal of the old, crumbling mortar. Professionals use special tools, like grinders or chisels, to carefully get out the bad stuff. They usually go about a quarter to half an inch deep. The goal here is to get a clean surface for the new mortar to stick to, without messing up the bricks themselves. It’s a dusty job, so safety gear is a must.
Applying New Mortar and Finishing Touches
Once the old mortar is out and the joints are clean and maybe a little damp (to help the new stuff stick), it’s time for the new mortar. This is where matching the color and texture of the original mortar really matters for how the finished job will look. The new mortar is carefully packed into the joints. After it’s applied, there’s a finishing step. Special tools are used to shape the new mortar so it matches the original joint profile – maybe it’s a smooth, rounded look or a sharp V-shape. This makes the repair blend in. Finally, any excess mortar is cleaned away. The whole point is to make it look like the damage never happened, or at least, to make it look a whole lot better and stronger. A good tuckpointing job can last for decades, protecting your investment.
The success of tuckpointing hinges on meticulous attention to detail at every stage. From the initial assessment to the final finishing touches, each step plays a role in the longevity and appearance of the repair. Skipping steps or rushing the process can lead to subpar results that won’t stand the test of time.
Here’s a quick look at the general steps involved:
- Inspection: Assessing the condition of the mortar and bricks.
- Removal: Carefully taking out the old, deteriorated mortar.
- Cleaning: Preparing the joints for new material.
- Application: Filling the joints with new, matched mortar.
- Finishing: Shaping the new mortar to match existing joints.
- Cleanup: Removing excess material and tidying the work area.
Key Considerations for Tuckpointing
When you’re getting ready to tackle tuckpointing, there are a few things you really need to think about to make sure the job turns out right. It’s not just about slapping some new goop into the cracks; there’s a bit more to it than that. Getting these details sorted beforehand can save you a lot of headaches later on.
Mortar Matching: Color, Texture, and Composition
This is probably the most important part for making the repair look good. You want the new mortar to blend in with the old stuff as much as possible. If you get it wrong, you’ll have these obvious patches that just look messy. The goal is to make the repair look like it’s always been there.
Here’s what goes into matching mortar:
- Color: This is tricky. Mortar fades and changes color over time due to weather and sun exposure. You’ll need to consider the original color, how it’s aged, and any pigments you might need to add. Sometimes, a slight difference is unavoidable, but you want to get as close as you can.
- Texture: The way the mortar feels and looks is also key. Is it smooth, sandy, or gritty? The texture of the aggregate (the small stones or sand in the mix) plays a big role here. You don’t want a smooth patch on a rough wall, or vice-versa.
- Composition: This is about what’s actually in the mortar. Older buildings often used lime-based mortars, which are softer and more breathable. Newer mortars might use Portland cement, which is harder and less forgiving. Using the wrong type can actually damage your bricks over time because they won’t expand and contract at the same rate.
Choosing the Right Mortar for Your Project
Picking the correct mortar mix is more than just aesthetics; it’s about the long-term health of your brickwork. Think of it like picking the right food for a pet – you need something that suits their specific needs.
- Historic Buildings: For older homes, especially those built before the mid-20th century, a lime-based mortar is usually the way to go. These mortars are softer and allow the masonry to "breathe," which is important for preventing moisture buildup and freeze-thaw damage. Trying to use a modern, hard cement mortar on an old brick wall can cause the bricks themselves to break down faster.
- Newer Construction: For more modern buildings, a Portland cement-based mortar might be suitable. These are stronger and more durable, but you still need to get the mix right for the specific bricks and climate.
- Climate Considerations: If you live in an area with harsh winters and lots of freeze-thaw cycles, you’ll need a mortar that can handle that. Water getting into the joints and freezing can cause serious damage. Some mortars are more resistant to this than others.
Getting the mortar mix wrong can lead to problems down the line. It might look okay at first, but if it’s too hard, too soft, or doesn’t bond well, you could end up with cracked bricks or joints that fail prematurely. It’s worth taking the time to get this right, or better yet, letting a professional handle it.
The Importance of Proper Curing and Sealing
Once the new mortar is in place, the job isn’t quite done. How you let it set and whether you seal it makes a big difference in how long it lasts. It’s like letting a cake cool properly before frosting it – rushing it can ruin the final result.
- Curing: Mortar doesn’t just "dry"; it cures. This is a chemical process that gives it strength. Keeping the new mortar damp for a period (usually several days to a week) helps it cure properly. This prevents it from drying out too quickly, which can lead to cracking and weakness. You might need to mist it with water periodically, especially in hot or windy weather.
- Sealing: After the mortar has cured, applying a masonry sealant can add an extra layer of protection. Sealants help repel water, preventing moisture from soaking into the mortar and bricks. This is especially helpful in areas that get a lot of rain or snow. It’s a good idea to check your [Google Business Profile](web_page_id) for local pros who can advise on the best sealants for your specific situation and climate.
Getting these details right ensures your tuckpointing job not only looks good but also provides lasting protection for your brick structure.
DIY Tuckpointing vs. Professional Expertise
So, you’ve noticed the mortar on your brickwork is looking a bit sad, maybe crumbling or has some gaps. Your first thought might be, ‘Can I just do this myself?’ It’s a common question, and honestly, for very small, non-critical areas, a DIY approach might seem tempting. You can save some money, and there’s a certain satisfaction in fixing things with your own hands. However, tuckpointing isn’t quite as straightforward as it looks in those quick online videos.
Common Tuckpointing Mistakes to Avoid
When you try to tackle tuckpointing yourself, it’s easy to run into a few snags. These aren’t just minor cosmetic issues; they can actually weaken your brickwork or make it look worse than before. Here are some of the usual suspects:
- Mortar Mismatch: Getting the color, texture, and even the strength of the new mortar to match the old stuff is surprisingly tricky. If it’s off, you’ll end up with a patchy, uneven look that really stands out.
- Improper Joint Preparation: Just slapping new mortar into a joint isn’t enough. You need to remove the old, damaged mortar to the right depth and clean the area thoroughly. Skipping this step means the new mortar won’t bond well, and the problem will just come back.
- Overfilling or Underfilling Joints: It sounds simple, but getting the mortar level and smooth with the brick face takes practice. Too much or too little can affect how water drains and how the wall looks.
- Ignoring Water Issues: Tuckpointing isn’t just about looks; it’s about sealing out water. If you don’t consider how water moves around your walls, you might be creating new problems down the line.
Why Professional Tuckpointing is Recommended
While a DIY project can be rewarding, tuckpointing is a specialized skill. Professionals bring a level of knowledge and experience that’s hard to replicate. They understand the different types of mortar, how they react to weather, and the best techniques for your specific building. This attention to detail is what separates a good repair from one that will need redoing in a few years.
Here’s what you get when you hire a pro:
- Expertise in Mortar Matching: They know how to mix mortar to perfectly match your existing material, making the repair virtually invisible.
- Proper Tools and Techniques: Professionals have specialized tools for removing old mortar and applying new mortar precisely, ensuring a strong, lasting bond.
- Structural Integrity: They can assess the overall health of your brickwork and ensure the repairs don’t compromise the building’s structure.
- Efficiency and Time Savings: While you might spend weekends struggling with a small section, a professional crew can often complete the job much faster.
When to Hire a Tuckpointing Contractor
If you’re seeing significant crumbling, large gaps in the mortar, or if bricks are starting to feel loose, it’s definitely time to call in the pros. For larger areas, high-up sections like chimneys, or if your building has historical significance, professional help is almost always the way to go. The cost of professional tuckpointing can vary, but it’s often a worthwhile investment. For instance, repointing brick joints might cost between $15-35 per square foot, depending on the complexity. Trying to fix major issues yourself could end up costing more in the long run if mistakes are made.
Attempting tuckpointing without the right knowledge can lead to more damage than you started with. It’s a job that requires a steady hand, a good eye, and a solid understanding of masonry principles. Professionals have spent years honing these skills, making them the best choice for preserving the integrity and appearance of your brick structures.
Beyond Tuckpointing: Related Masonry Services
Tuckpointing is a fantastic way to fix up your brickwork, but sometimes, your masonry might need a little more attention. Think of it like this: tuckpointing is like getting a really good haircut and trim, but what if your hair is also a bit dry or you have some split ends that need more than just a trim? That’s where other masonry services come in.
Brick Cleaning and Restoration
Over the years, bricks can get pretty grimy. Pollution, dirt, and even just plain old weather can leave them looking dull and sad. Brick cleaning uses special methods to get rid of this gunk without damaging the bricks themselves. Sometimes, it’s just a good scrub, other times it might involve gentle pressure washing or even chemical treatments for really stubborn stains. Restoration goes a step further, aiming to bring back the original look and feel of the brickwork, which can be especially important for older buildings. It’s amazing what a good cleaning can do to make your house look new again.
Waterproofing and Protective Sealants
Water is a brick’s worst enemy. It can seep into the mortar and bricks, freeze in the winter, and cause all sorts of cracking and damage. Applying waterproofing treatments or sealants creates a barrier that stops water from getting in. This is super important for walls that get a lot of rain or are in damp areas. It’s like putting a raincoat on your house. Different products work for different types of brick, so it’s good to get advice on what’s best for your situation. A good sealant can really extend the life of your masonry.
Brick Replacement and Structural Repairs
Sometimes, a brick is just too far gone. Maybe it’s cracked all the way through, crumbling, or has been badly damaged. In these cases, individual bricks need to be carefully removed and replaced with new ones. This sounds simple, but it’s a job that requires a skilled hand to make sure the new brick matches the old one and that the wall’s structure isn’t compromised. For more serious issues, like bowing walls or significant structural damage, you’ll definitely need professionals who can handle major brick repair and ensure the building is safe and sound. They can assess the whole structure and figure out the best way to fix any underlying problems, not just the surface stuff. This kind of work is key to keeping your building standing strong for years to come, and it’s definitely not a DIY job for most people. If you’re dealing with significant damage, it’s wise to look for experienced masonry repair services in your area.
Tuckpointing is important, but we do much more for your building’s masonry! From fixing damaged lintels to rebuilding chimneys and walls, we handle all sorts of repairs. We also clean and seal surfaces to keep them looking great and protected. If your building needs attention beyond basic tuckpointing, we’ve got you covered. Visit our website to see the full range of services we offer and get a free quote today!
Wrapping It Up
So, we’ve gone over what tuckpointing is, why it’s important for your brick buildings, and how it’s done. It’s not just about making things look pretty; it’s about keeping your structure solid and safe for years to come. While some folks might think about tackling this themselves, it’s usually a job best left to the pros. They’ve got the know-how and the right tools to get it done right the first time, saving you headaches and maybe even some cash down the line. Keeping your brickwork in good shape means protecting your investment and keeping your property looking its best.
Frequently Asked Questions
What exactly is tuckpointing?
Tuckpointing is a way to fix up the mortar, the stuff that holds bricks together. When the old mortar starts to crumble or fall out, tuckpointing means taking out the bad bits and putting in fresh mortar. It makes the wall strong again and look much better, like new!
How do I know if my house needs tuckpointing?
Look closely at the lines between your bricks. If you see cracks, crumbling bits, or if the mortar seems to be disappearing, it’s probably time for tuckpointing. Also, if bricks start to feel loose, that’s a big sign the mortar isn’t doing its job anymore.
Is tuckpointing the same as repointing?
They are very similar, and people often use the words interchangeably. Think of tuckpointing as a more precise job. It often involves carefully filling the joint with new mortar and sometimes adding a thin strip to make the joints look neat and narrow. Repointing can sometimes mean removing more of the old mortar and replacing it more broadly.
Can I do tuckpointing myself?
While you can try some small repairs yourself, tuckpointing is usually best left to the pros. It’s tricky to get the mortar mix just right, match the color perfectly, and apply it evenly without causing more damage. Mistakes can end up costing more to fix later.
What happens if I don’t get tuckpointing done?
If you ignore crumbling mortar, water can seep into the cracks. This can cause bigger problems like mold, freeze-thaw damage that breaks bricks, and even make the whole wall unstable. It’s much cheaper to fix the mortar early than to repair major damage later.
How long does tuckpointing last?
When done correctly by a professional, tuckpointing can last for a long time, often 15 to 30 years or even more! It really depends on the quality of the work, the materials used, and how harsh the weather is in your area.