Tuckpointing is a time-honored masonry technique that breathes new life into brick and stone structures, preserving their beauty and structural integrity. Whether you’re a homeowner looking to maintain your property’s charm or a property manager aiming to protect a historic building, understanding tuckpointing is essential. This process not only enhances the aesthetic appeal of masonry but also safeguards it against environmental damage, potentially saving thousands in costly repairs. In this guide, we’ll explore what tuckpointing is, when it’s needed, how it’s done, its costs, DIY considerations, and tips for hiring professionals, providing you with a complete picture of this vital maintenance practice.
What is Tuckpointing?
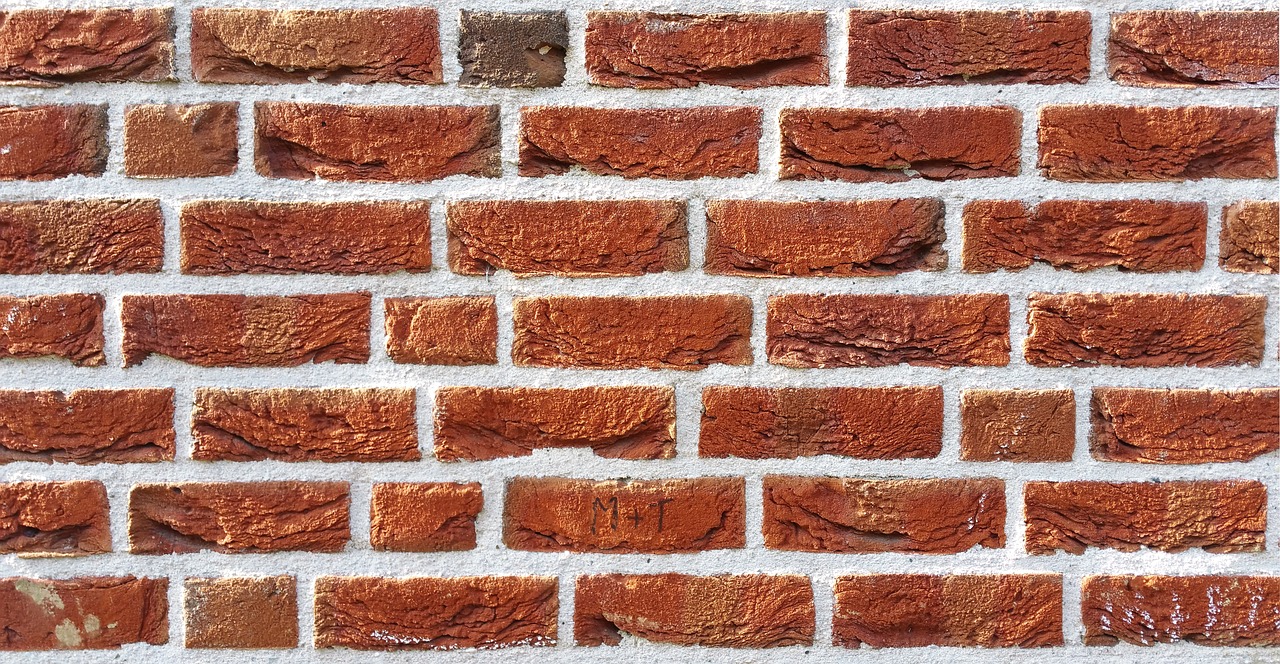
Tuckpointing, also known as repointing or brick pointing, is the process of repairing and replacing deteriorated mortar joints between bricks or stones in masonry structures. Mortar, the binding material that holds bricks together, naturally wears down over time due to exposure to moisture, temperature fluctuations, and other environmental factors. Tuckpointing involves removing damaged or crumbling mortar and filling the joints with fresh mortar, creating a strong, seamless bond that restores both function and appearance.
The term “tuckpointing” originates from the traditional method of using two types of mortar: a base layer to fill the joint and a thinner, contrasting “fillet” to create the illusion of precise, narrow joints. This technique not only strengthens the structure but also enhances its visual appeal, giving masonry a clean, polished look. Beyond aesthetics, tuckpointing seals gaps to prevent water infiltration, which can lead to mold, mildew, or structural damage. By maintaining the integrity of walls, chimneys, or other masonry features, tuckpointing extends the lifespan of your structure, often for 15–30 years, depending on materials, climate, and maintenance.
Why is Tuckpointing Necessary?
Mortar joints are the unsung heroes of masonry, holding bricks or stones together while allowing for slight movement to accommodate environmental changes. However, mortar typically lasts 20–30 years before it begins to deteriorate. Signs that tuckpointing is needed include:
- Cracked or Crumbling Mortar: Visible cracks or flaking mortar indicate wear that can compromise structural stability.
- Missing Mortar: Gaps or partially missing joints allow water to seep into the masonry, leading to further damage.
- Spalling or Crumbling Bricks: When mortar fails, bricks may crack or erode, signaling an urgent need for repair.
- Water Infiltration: Stains, mold, or mildew on interior walls suggest moisture is penetrating through damaged joints.
- Protruding Mortar: Mortar that sticks out unevenly can disrupt the structure’s appearance and integrity.
Neglecting these signs can lead to severe consequences. Water infiltration can cause mold growth, increase energy costs due to poor insulation, and weaken the structure, potentially requiring expensive repairs like brick replacement or foundation work. In older buildings, which often lack modern drainage features like weeps or vents, tuckpointing is especially critical to prevent moisture from reaching interior finishes. Additionally, cracks in mortar may indicate deeper issues, such as foundation settling, which requires a structural engineer’s assessment before tuckpointing begins.
Proactive tuckpointing is ideal, addressing issues before they escalate. Regular inspections by a trained mason can catch early signs of deterioration, saving you from costly repairs and preserving your property’s value and community heritage.
How is Tuckpointing Done?
Tuckpointing is a meticulous, labor-intensive process that requires skill and precision. Here’s a step-by-step overview of how it’s typically performed:
- Assessment: A mason inspects the masonry to identify damaged mortar and determine the extent of repairs needed. They may test for loose mortar by probing joints with a tool.
- Mortar Removal: Using tools like a grinder, router, or chisel, the mason carefully removes deteriorated mortar to a depth of about ¼ to ½ inch, ensuring a clean surface for new mortar. Safety gear, such as goggles, respirators, and dust suppression systems, is used to manage fine dust particles.
- Surface Preparation: The joints are cleaned of debris and moistened to improve adhesion of the new mortar.
- Mortar Application: Fresh mortar, matched to the original in color and composition, is applied using a joint filler tool or masonry hawk. Horizontal joints are typically filled first, followed by vertical ones.
- Finishing: The mason uses a jointing tool to shape the mortar, matching the existing joint style (e.g., concave, V-joint) for a seamless look. A thin fillet of contrasting mortar may be added for aesthetic precision in traditional tuckpointing.
- Cleanup: Excess mortar is brushed off, and the joints are checked after 30 minutes to ensure proper setting. Additional mortar may be added if needed.
The key to successful tuckpointing is matching the new mortar to the existing one in color, texture, and strength. This often involves working with a masonry supplier to add pigments or select the right mortar type (e.g., lime-based or Portland cement). Poorly matched mortar can result in a patchy appearance or structural issues, as incompatible materials may not bond properly or withstand weather conditions.
How Much Does Tuckpointing Cost?
The cost of tuckpointing varies based on several factors, including the size of the project, accessibility, mortar type, and labor rates. Chimneys can be more complex due to their height and structure, which may affect pricing. Larger homes or full exterior projects typically require more time and materials, contributing to a higher overall estimate.
Key factors influencing cost include:
- Project Size: Larger areas or extensive damage increase costs.
- Accessibility: Hard-to-reach areas, like high chimneys, require specialized equipment, adding to expenses.
- Mortar Type: Specialty mortars, such as those for historic buildings, are pricier.
- Labor: Experienced masons usually charge more per hour, depending on expertise and region.
- Seasonality: Dry, mild weather (late spring or early fall) is ideal, but scheduling during peak seasons may raise costs.
- Historic Properties: Compliance with preservation codes can increase expenses due to specialized materials or techniques.
For smaller projects, like a single wall or chimney, costs may be more manageable, starting at a few hundred dollars. Requesting multiple quotes from professionals ensures a fair price and helps you gauge the scope of work.
Can You DIY Tuckpointing?
Tuckpointing is a labor-intensive task that requires precision, but it’s possible for homeowners with the right tools and skills to tackle smaller projects. DIY tuckpointing can save money, but it comes with challenges and risks. Here’s what you need to know:
Tools and Materials:
- Mortar raking tool, hammer, and chisel for removing old mortar.
- Joint filler tool, jointing tool, and masonry hawk for applying new mortar.
- Safety gear (goggles, gloves, respirator) to protect against dust and debris.
- Mortar mix and pigments to match the existing mortar color.
Basic Steps:
- Remove damaged mortar to a depth of ¼ to ½ inch using a raking tool or chisel.
- Clean the joints and moisten them to ensure proper adhesion.
- Apply new mortar using a joint filler tool, starting with horizontal joints, then vertical ones.
- Shape the joints with a jointing tool to match the existing style.
- Brush off excess mortar and check the joints after 30 minutes, adding more if needed.
Challenges:
- Color Matching: Achieving a seamless mortar color match is difficult without experience.
- Skill Level: Uneven joints or improper mortar depth can weaken the structure.
- Noise and Dust: Power tools like grinders create significant noise and dust, requiring proper safety measures.
- Structural Risks: Replacing entire bricks or working on load-bearing walls is best left to professionals.
For extensive damage or critical areas like exterior load-bearing walls, hiring a professional is recommended to avoid compromising safety or aesthetics.
Alternatives to Tuckpointing
While tuckpointing is highly effective, there are alternatives depending on the condition of your masonry:
- Brick Sealing: Applying a protective sealant prevents moisture penetration, extending brick life without replacing mortar.
- Repointing: Similar to tuckpointing, repointing focuses on structural repair rather than aesthetic precision, often at a lower cost.
- Masonry Cleaning: Cleaning can refresh the appearance of brickwork without mortar replacement.
- Waterproofing: Specialized coatings protect against water damage, ideal for high-moisture areas.
- Brick Replacement: Severely damaged bricks can be replaced individually, avoiding full tuckpointing.
Each option has its place, but tuckpointing remains the gold standard for addressing mortar deterioration while enhancing appearance.
Tips for Hiring a Professional Tuckpointing Mason
Choosing the right mason is critical for quality results. Here are tips to ensure you hire a skilled professional:
- Check Expertise: Look for masons with specific tuckpointing experience, as not all masonry companies specialize in this technique.
- Review Portfolios: Ask to see examples of past work, focusing on their ability to match mortar color and achieve clean, even joints.
- Verify Credentials: Ensure the mason is licensed, insured, and familiar with local building codes, especially for historic properties.
- Request Multiple Quotes: Compare at least three quotes to understand the average cost and scope of work.
- Ask About Materials: Confirm they use high-quality, compatible mortar and can match the existing masonry.
- Check References: Contact previous clients or visit completed projects to assess quality.
- Discuss Timing: Schedule work during mild, dry weather (50°F–90°F) for optimal mortar curing.
A skilled mason will deliver durable, visually appealing results that protect your property for decades.
Is Tuckpointing Worth It?
Tuckpointing is a worthwhile investment for any masonry structure. It enhances curb appeal, increases property value, and prevents costly damage from water infiltration. By addressing mortar deterioration early, you avoid issues like mold, reduced insulation, and structural instability. Whether you’re preserving a historic building or maintaining your home, tuckpointing fosters pride in your property and community.
For professional tuckpointing services you can trust, contact Casey Tuckpointing, serving the Chicagoland area. Our experienced masons deliver high-quality results, ensuring your Chicago masonry stands strong and beautiful for years to come. Get in touch today for a free consultation and protect your property’s future!